Why Connect HubSpot to Google Sheets?
Importing HubSpot data into Google Sheets opens up a realm of possibilities. The flexibility to build dynamic dashboards, share insights effortlessly with team members, and integrate HubSpot CRM data with other sources is invaluable. Enter Dokin, a no-code solution designed to cater to the unique needs of small businesses, offering customizable templates and built-in data integrations.
How to sync Google Sheets with HubSpot?
Dokin - Your No-Code Solution
Dokin offers an easy and immediate way for connecting HubSpot to Google Sheets. With Dokin you can import data from your CRM to Sheets and set up regular automatic refresh of your spreadsheet based on HubSpot data.
You can also edit the imported records or add new ones and push everything back to HubSpot in just a click. This 2-way sync helps you manage large data of your CRM and keep a good handle of your CRM data. Moreover, since Dokin also integrates with more than 20 tools, you can update your CRM records based on data imported from tools like PostgreSQL, Airtable or Salesforce.
With its user-friendly interface and no-code approach, Dokin simplifies the entire process offering the possibility to pull and sync your data in Sheets and manage your CRM data in yout spreadsheets.
What can you achieve connecting HubSpot and Dokin?
The journey begins with connecting your HubSpot data to Dokin. Once this connection is established, you gain access to a world of possibilities:
- In Google Sheets: Visualize your HubSpot data, edit it, and effortlessly push updates back to HubSpot. This means you can work on your data within the familiar Google Sheets environment and ensure that it seamlessly syncs with your HubSpot CRM.
- In Google Slides or Docs:
- Create always up-to-date files. Enhance your presentations and documents by inserting HubSpot field values directly. These values are linked to their corresponding entries in HubSpot, enabling you to access the source information effortlessly. Any changes made in HubSpot are automatically reflected in your documents when you refresh them manually or automatically.
- Perform Mail Merge: Dokin empowers you to create multiple documents, each tailored to a HubSpot contact or company, automatically. This saves you valuable time and allows for personalized content generation.
Let's dive into the steps to achieve this integration
To get started, you can also use one of Dokin’s free HubSpot dashboard templates. These are pre-built by the Dokin team and powered directly by your own HubSpot data. You simply need to select the dashboard, connect Dokin to your HubSpot account and you are all set!
Step 1: Select the HubSpot App
On the home page, you'll find a list of your imported data, as well as a button for creating new connections. Click on the "Connect New Data" button.
Click on "Connect new Data" and select the HubSpot App
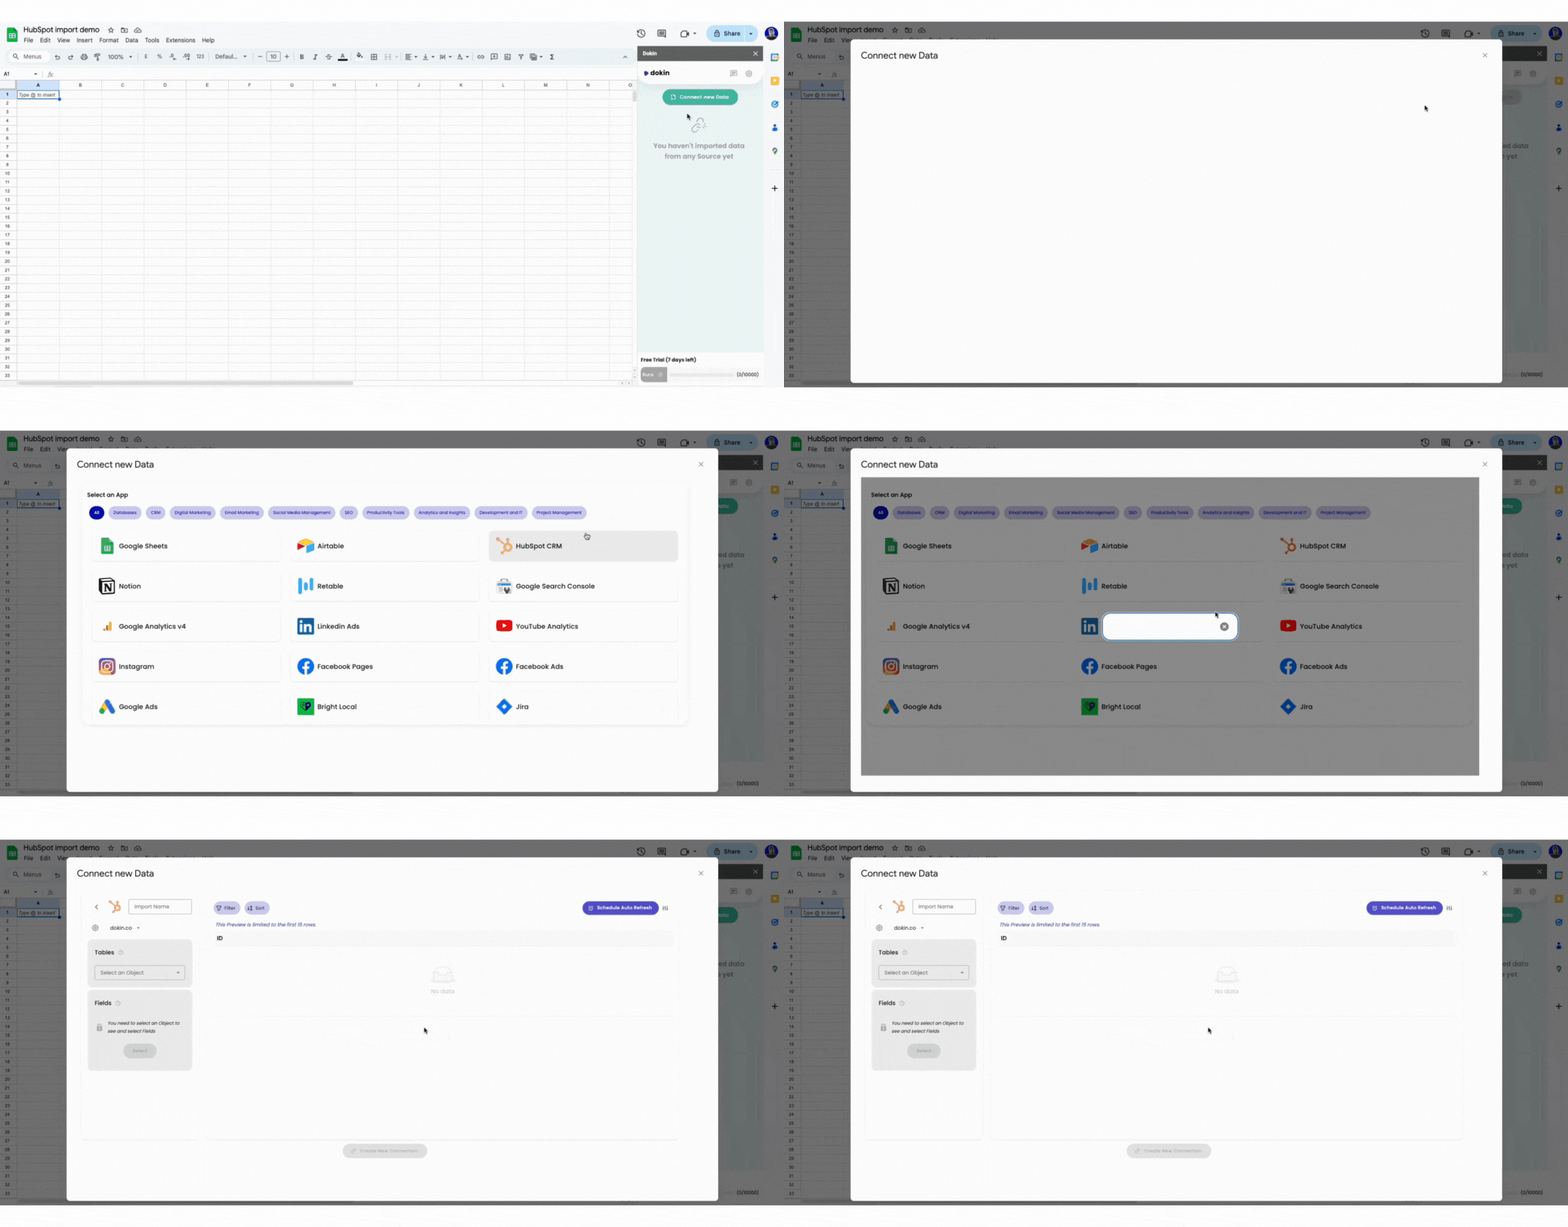
Importing data from Scratch or from a Template
When it comes to importing data, you have two options: starting from scratch or using a template you've created before. Templates can significantly speed up the data import process. To discover how to create and reuse templates, please consult our step-by-step article.
Step 2: Connect to your HubSpot Account
If this is your first time using Dokin or if your previous connection has expired or been revoked, follow these steps to connect your HubSpot account:
- Click on "Connect" Button. You will be redirected to a secure HubSpot connection page.
- On the HubSpot connection page, choose the account you want to connect, then click on the "Choose Account" button.
This secure process ensures that Dokin can seamlessly integrate with your HubSpot data while maintaining the necessary privacy and security standards.
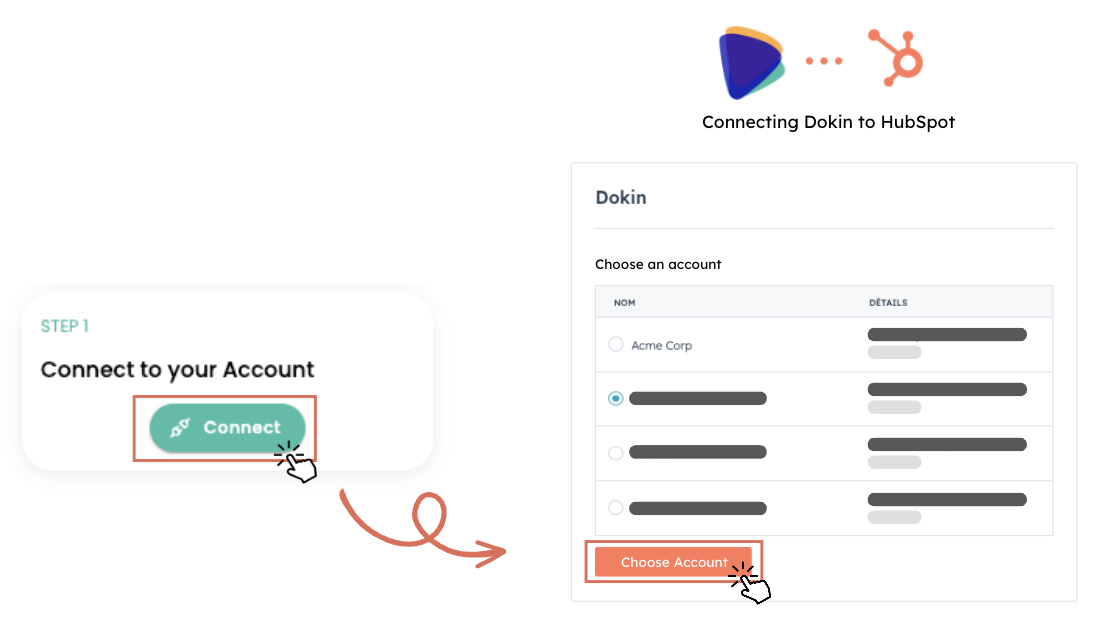
Follow this flow to connect your HubSpot account
Step 3: Select the Data to Import from HubSpot
Follow these steps to choose the data you want to import from HubSpot. This process allows you to import all records from a specific HubSpot Object, that meet your specified criteria.
1. Select a Table
Begin by selecting the HubSpot object from which you intend to import data.

2. Select the Fields
Next, pick the fields you wish to display in your import. Dokin will pre-select the most common fields but by clicking on the “Edit” button you have the flexibility to select anywhere from one to an unlimited number of fields, tailoring the import to your precise needs.
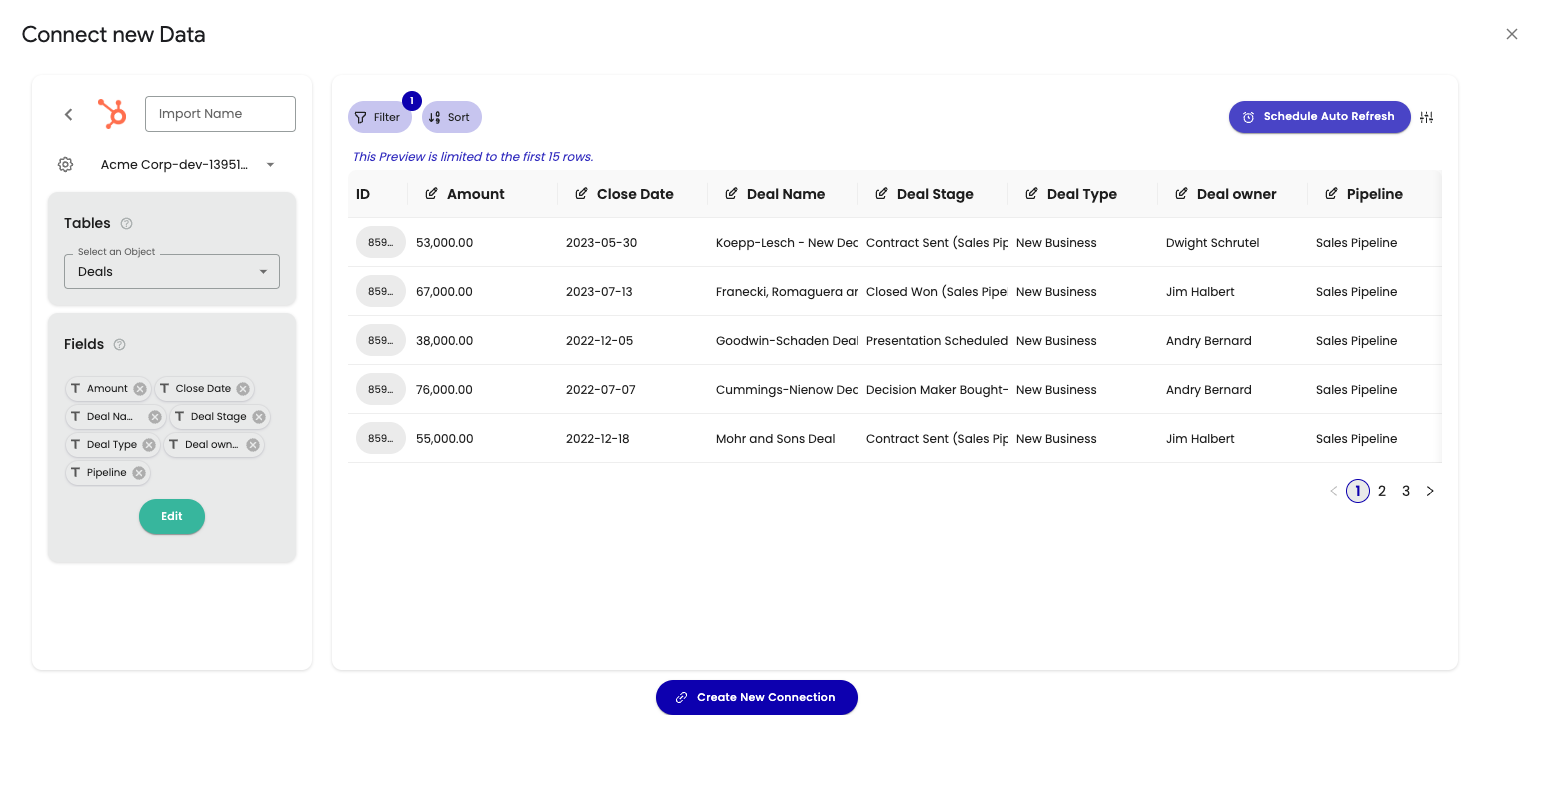
You can also select fields from Associated tables. For example if you selected as an object “Deals”, you can select fields from your “Deals” table but also select fields from associated tables like “Contacts” or “Companies”

Once you've made your selections, you can rearrange the fields to your liking. This can be achieved with a simple drag-and-drop action, ensuring that the data is presented in the most logical and useful order for your specific needs.
3. Optional: Filtering and Sorting
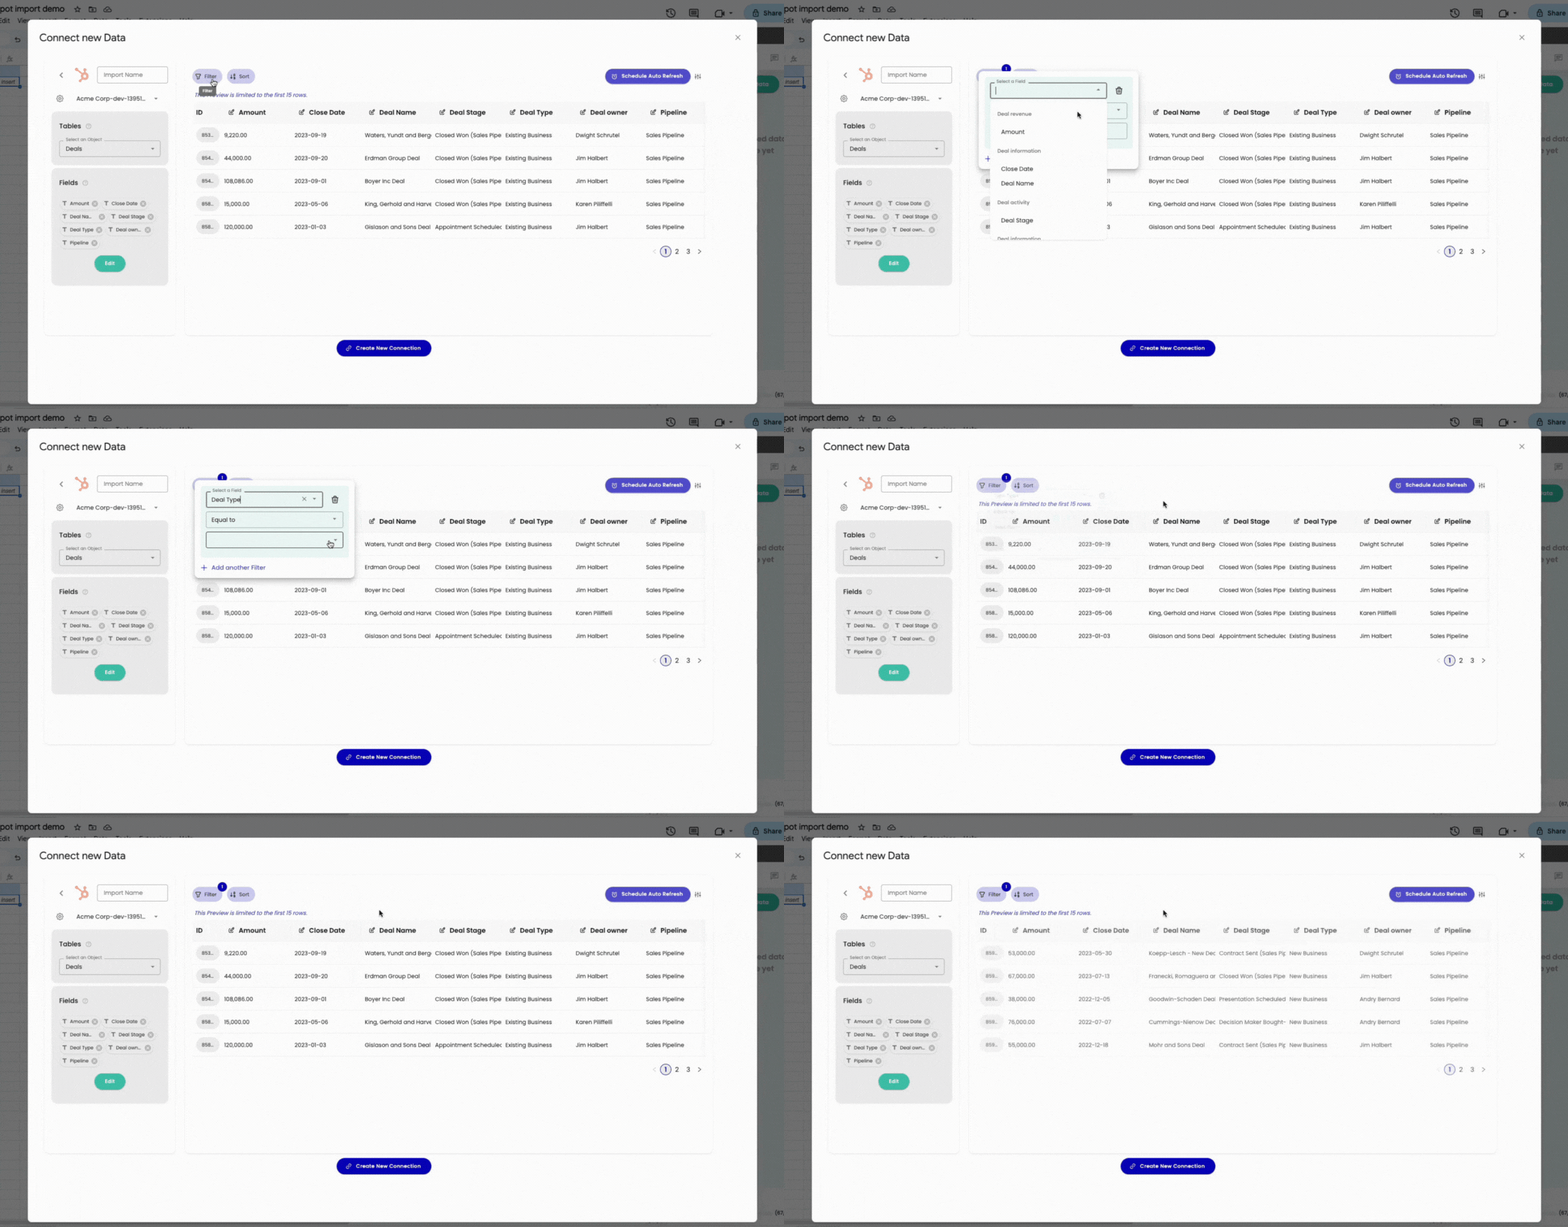
For additional customization, you can apply filters and sorting to your imported data. This step is optional.
Filtering
- Select the field you want to filter by
- Choose an operator (such as Equal, Contains, Less Than, etc.). The operator depends on the type of field.
- If needed, enter the value.
Sorting
If you want your data to be presented in a specific order, select the sorting field and indicate whether it should be in ascending or descending order.
4. Optional: Customize your Import
4.1 - Assign a Name to your Import
Choose a meaningful name for your import process. This name will help you easily identify and manage your imported data within Dokin.

4.2 - Set Up Scheduled Refresh
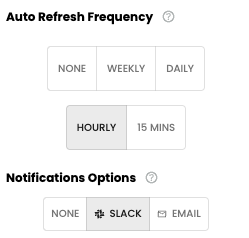
This option will automatically refresh your data at specific intervals. You can choose the frequency, including the day and time, and configure notifications to receive alerts when data is refreshed.
Google Sheets
An automatic refresh means that at your specified intervals, the information imported into your Google Sheets will be automatically updated. This ensures that your data remains accurate and reflects the latest changes.
Google Slides and Google Docs
An automatic refresh means that at your specified intervals, the information inserted into your Google Slides or Google Docs will be refreshed. This dynamic updating ensures that your presentations and documents always reflect the most current data, saving you the hassle of manual updates.
Frequency
Specify how often you want Dokin to automatically refresh your imported data. This ensures that your data remains current without requiring manual updates.
The frequencies are available:
- No Refresh (default)
- Weekly: Data refreshes every week. Select a specific day of the week and time for data refresh.
- Daily: Data refreshes every day. Choose the time for daily data updates.
- Hourly: Data refreshes every hour.
- 15 mins: Data refreshes every 15 minutes.
Notifications
You can opt to receive notifications each time your data is refreshed. The available notification options include:
- None: No notifications will be sent.
- Slack: You will receive a Slack message whenever your data is refreshed. If it's your first time selecting this option, you'll be prompted to connect to your Slack workspace.
- Email: You will receive an email notification each time your data is refreshed.
You can define an auto refresh for your data, with notifications
Step 4: Push Back Data from Google Sheets to HubSpot
Learn how to efficiently export data from Google Sheets back to HubSpot using Dokin.
Connect HubSpot Data Using Dokin
Before you can push data back from Google Sheets to HubSpot, you need to establish a connection between the two platforms.
Follow the tutorial below to learn how to connect HubSpot data using Dokin.
Write Data in Your Spreadsheet
Common Warning
Before pushing data to HubSpot, it's essential to understand a few key points:
Read-only fields. Some fields in your Google Sheets are read-only, indicated by a grey background. Any data written in these columns will not be updated in HubSpot and will be disregarded.
Fields with options: For columns with predefined options, ensure that the data you enter matches one of the available options; otherwise, you may encounter errors.
As of today, it is not possible to push back data from an associated table. For example, if you imported the object "Contact", but also fields from the table "Company", only entries from the object "Contact" will be created or updated.
Case 1: Updating an imported Record
If you wish to update an existing HubSpot record, simply overwrite the data in the corresponding row of your spreadsheet.

Overwrite data to update a record
Case 2: Creating a new Record
To create a new record, simply write data in a new row of your spreadsheet. Leave the column "ID" blank. An ID will be automatically generated when the record is created.

Write data in a new row to create a record
Push data back to HubSpot
Once you are satisfied with the data you want to transfer, proceed with the following steps:
- On the corresponding Connection, click on the refresh icon
- Click on the menu item "Write Data back to HubSpot CRM"
A preview page will appear. This allows you to preview records that were edited and new records added. You can compare spreadsheet data to data in HubSpot.
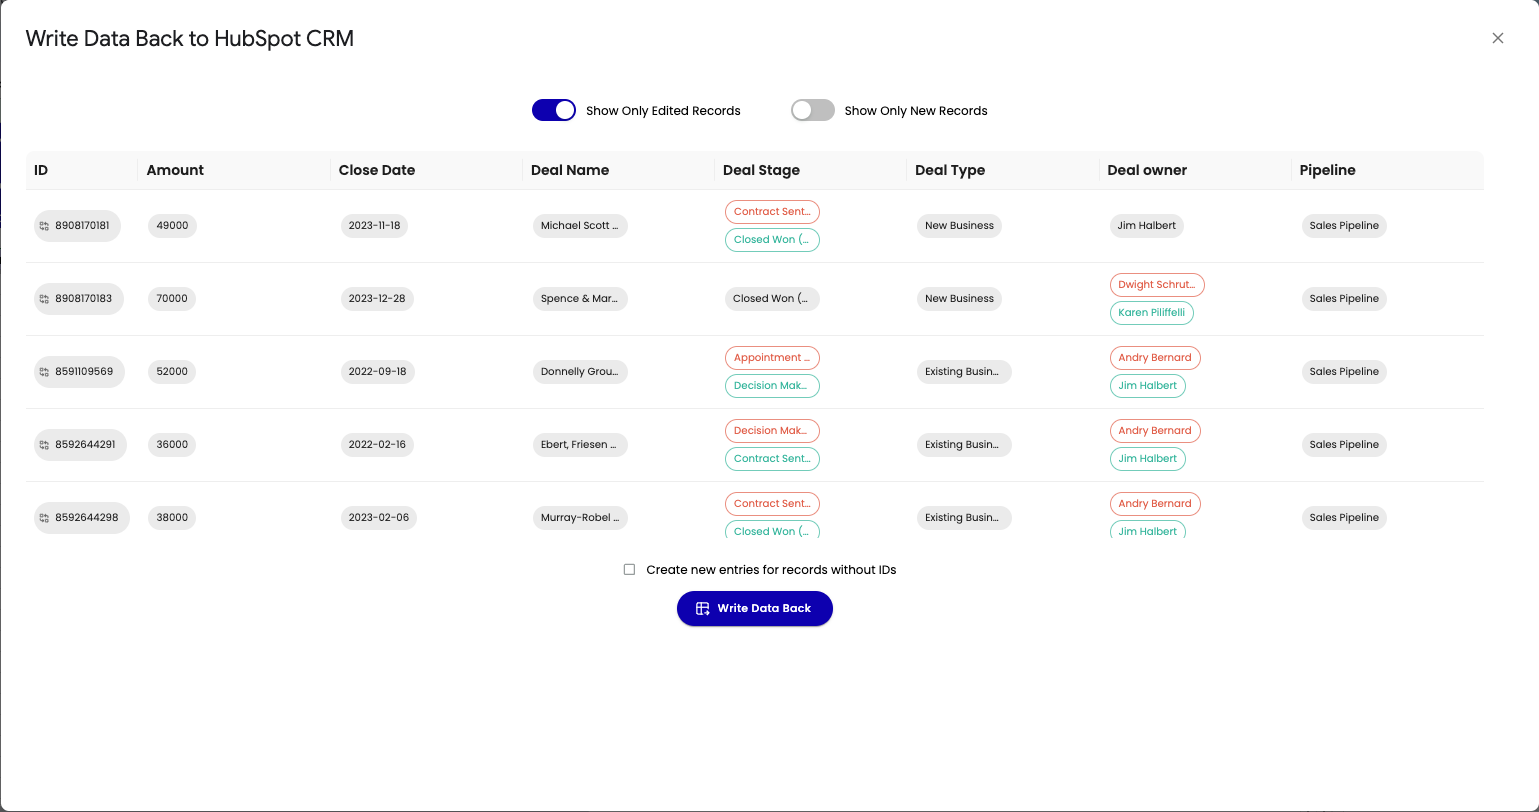
Dokin will then perform the following checks:
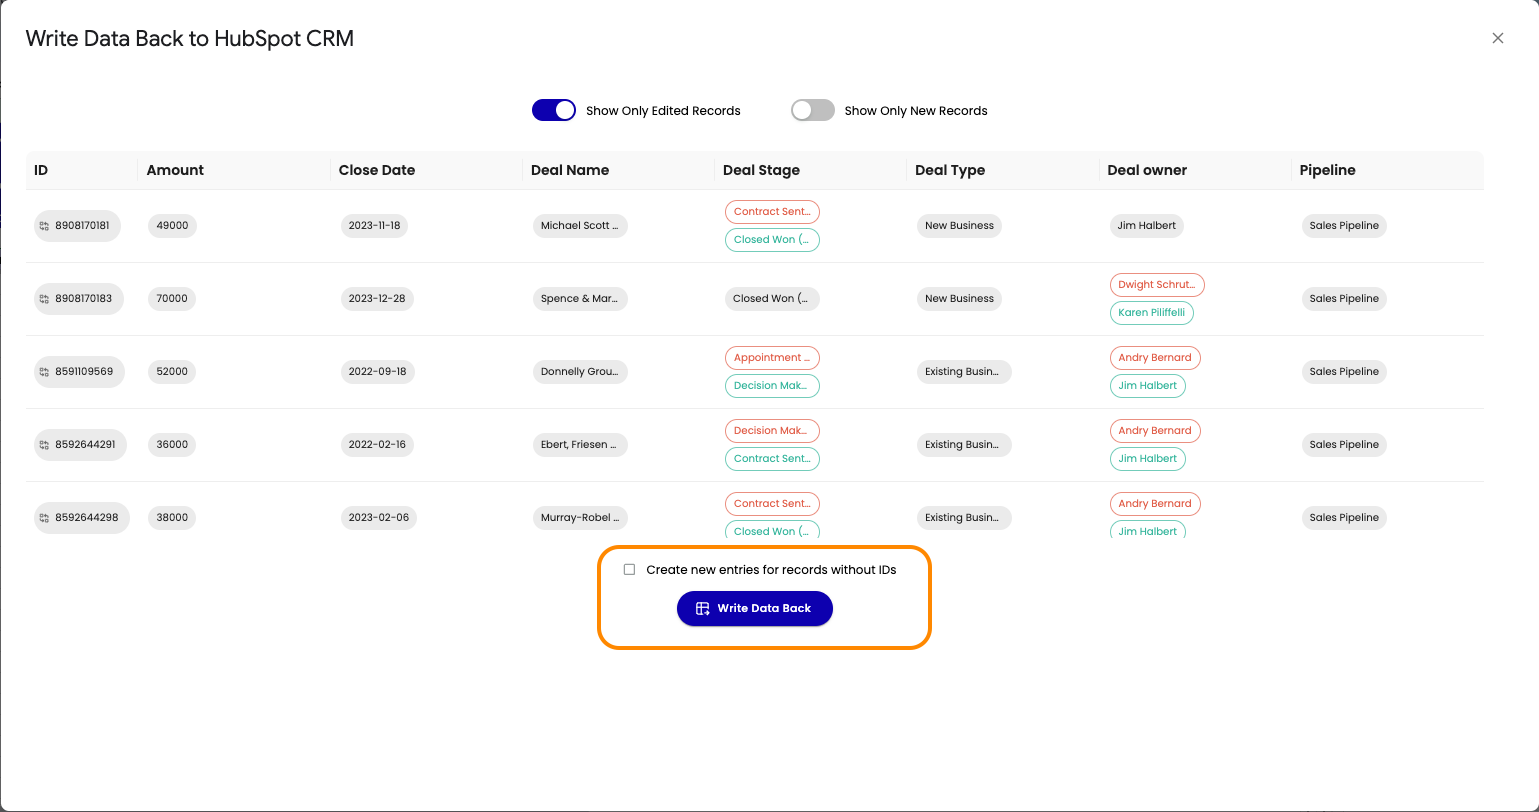
Case 1: Records Without IDs
If some records in your spreadsheet do not have an ID, Dokin will detect this and ask if you want to create new entries for records without IDs. You can choose to check or uncheck this option based on your preference.
Alternatives to Dokin
If you’d like to explore alternatives there are some options. However Dokin is the only one that is easy and quick to implement and which comes at the cheapest price and with a free option.
HubSpot Workflows
HubSpot's native workflows offer integration but are more manually intensive.
However, integrating HubSpot with Google Sheets via workflows has several downsides and limitations. You’ll need to consider the critical factors below beforehand:
- Your header row must begin in the first column of the first row.
- HubSpot can’t send data to unlabeled columns, so every column header must have a label to allow HubSpot to identify and send data to it.
- All columns in your table range must have column headers. Having blank column headers between columns can cause issues and keep the spreadsheet from updating accordingly. For instance, if your data range includes columns A to D, don’t leave the headers in columns B or C blank.
- HubSpot can only update the first 100 columns in your spreadsheet.
Additionally, to avoid potential errors, you must avoid manually adding data to the spreadsheet. To add data manually, you must create a new sheet within the same spreadsheet and reference the data from the original sheet.
You’ll also need to check dependent workflows before disconnecting and reconnecting Google Sheets with another user. Otherwise, you might send data to an unintended Sheet.
These shortcomings add up. Unless you’re performing a one-time data pull, HubSpot workflows can turn into a timesink.
Dokin's no-code approach outshines this method for faster and more complex use cases.
Coefficient
Coefficient also offers an alternative to Dokin and HubSpot workflows. However, while it is a helpful solution, their pricing is very prohibitive, starting at $59 per month. As a comparison, Dokin starts at only $7 per month, also offering a free plan. Hence, while Coefficient provides an alternative, Dokin's simplicity and efficiency make it the standout choice.
Zapier
Zapier provides automation but comes with limitations. Itonly works with the pre-designed workflows in the app. This limits the data you can work with, including new contacts, new columns, and custom fields.
Zapier makes it difficult to export HubSpot deals, specified properties, and other HubSpot data, impacting your efforts to build custom HubSpot reports easily.At that point, you’ll have to harness the HubSpot API, and this will require coding skills.
Dokin, with its simplicity, remains the superior choice.
Conclusion
By following these simple steps, you can connect HubSpot data to Google Sheets. With Dokin, you can easily manage data between your CRM and spreadsheets. We hope that this tutorial has been helpful, and if you have any questions or feedback, please feel free to contact the Dokin support team.
With Dokin business teams can centralise their data, visualise key metrics, and make data-driven decisions without having to involve a tech team. Get started today with Dokin, it’s free!

.png)
.png)


.png)